While in the Philippines last fall I had quite a variety of banana dishes - and they were all amazing. I found a similar recipe online to one of the dishes called Turon Saba. Tasty- but not quite as tasty as the originals. Too bad I don't have a banana tree growing in the backyard with fresh bananas of all sorts.
Recipe:
pancakes:
3 eggs
2/3 cup cornstarch
1/3 cup flour
1/2 teaspoon of salt
Brown sugar and frying oil
Cardava Bananas
Beat the egg whites first. Add in the yolk, the flour, cornstarch and salt. The dough should have a nice gooey and sticky texture. Heat up a pan, no grease. The pan should be warm enough that you can quickly touch the pan without burning your finger. Take the gooey dough ball in your hand and spread over the pan, scrape off excess dough with spatula so you have a nice thin pancake. After about 10-15 seconds its done; no need to turn it over. Slice the bananas and coat them in brown sugar. Heat up a skillet with half an inch oil and add 1/2 cup of brown sugar. Wrap sugar coated bananas in the pancake and seal with water. Place in frying pan on both sides until dark golden brown.
Wednesday, March 20, 2013
Vintage edge braid
I don't really know what to call this hairstyle and it was a bit of an experiment starting from strange side braids turning into a more vintage styled bun. Like a waterfall braid you add hair only to one side of the french braid. But to get this braid look you add hair to the opposite side than where the hair taken from.
Spring Break Kick Off
Starting my Spring Break with a new pair of kicks. They have Nike Plus built into them so I can hook them up with my iphone and track my runs. Oh technology, so much to learn :-O To top my healthy intentions off, Jeremy and I went to Granite City for dinner and spoiled ourselves with this giant deep dish cookie for dessert.
Wednesday, February 27, 2013
Doodle Ring
I'm so excited to be back in metal class making jewelry. Our first assignment was a linear ring from a drawing or to be more exact, doodles that I drew during one of my other classes :-). Cast in Sterling Silver from a wax model.
Busy Bee
Sorry about poor posting. Life has been crazy busy lately. I've been trying to finish my portfolio website and my portfolio for the career fair. I finally finished everything, but because of Rocky, the crazy snow storm creeping across the states, it got cancelled - so anticlimactic. Here is a link if you'd like to check it out. www.anne-norgaard.com
Tuesday, February 26, 2013
American Cookies
I made these cookies a while back and they are seriously the best cookies I have ever had. Chewy, crunchy and lots of chocolate.
Chocolate Chip Cookies Recipe
2 cups minus 2 tablespoons (8 1/2 ounces) cake flour
1 2/3 cups (8 1/2 ounces) bread flour
1 1/4 teaspoons baking soda
1 1/2 teaspoons baking powder
1 1/2 teaspoons coarse salt (I used kosher salt)
2 1/2 sticks (1 1/4 cups) unsalted butter
1 1/4 cups (10 ounces) light brown sugar
1 cup plus 2 tablespoons (8 ounces) granulated sugar
2 large eggs
2 teaspoons natural vanilla extract
8 ounces semi-sweet chocolate, chopped into chunks
4 ounces unsweetened chocolate, grated
8 ounces semi-sweet chocolate chips
sea salt
Sift flours, baking soda, baking powder and salt into a bowl. Set aside. Mix cream butter and sugars
together until very light, about 5 minutes. Add eggs, one at a time,
mix well after each addition. Stir in the vanilla. Reduce speed to
low, add dry ingredients and mix until just combined, 5 to 10 seconds.
Stir all chocolate into dough. Cover dough and refrigerate for 12 to 36 hours. Dough may be used in
batches, and can be refrigerated for up to 72 hours. Bake at 350 F for 10-12 minutes.
Labels:
American Cookies,
Chocolate Chip,
Cookies,
Recipes
French Fishtail braid
I've been wearing my hair like this a lot lately - love fishtail braids. Finally got a good picture of it.
Sunday, February 3, 2013
Photoshop Surgery Tutorial
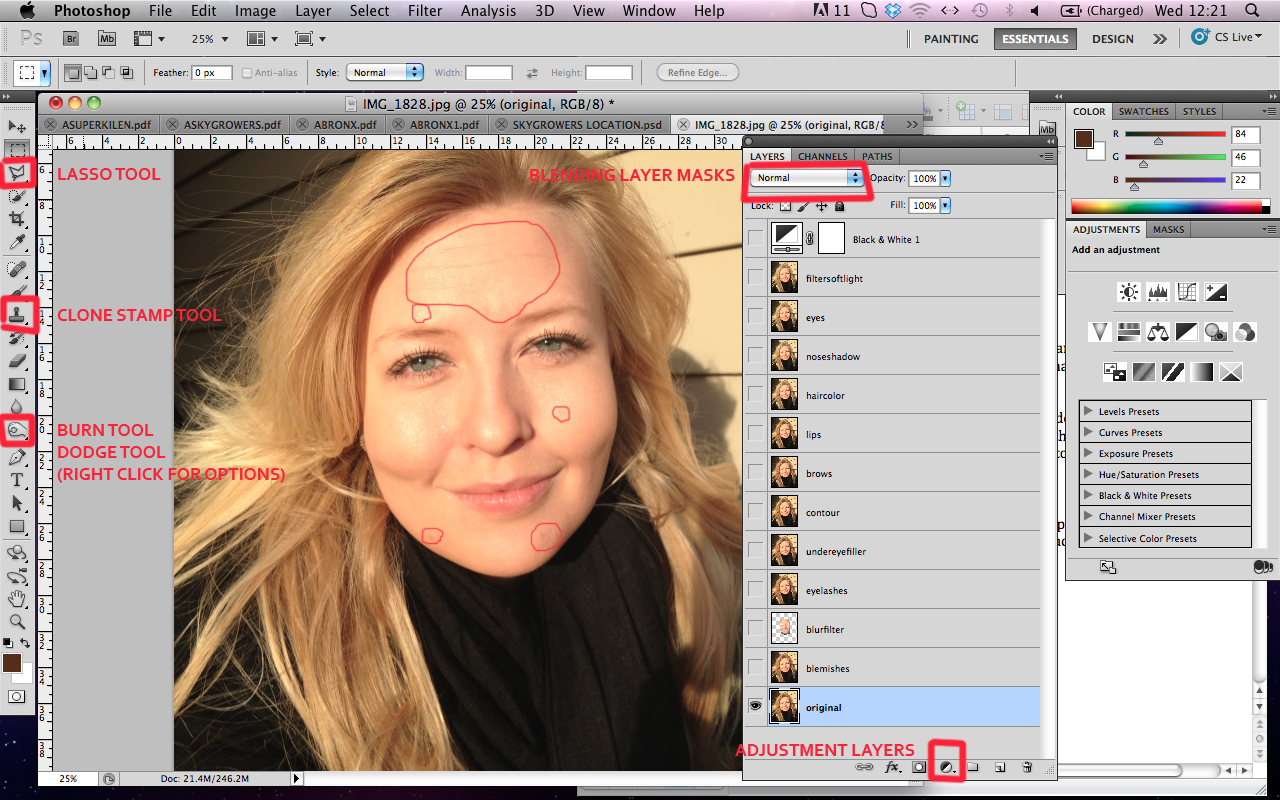
Normally I use Photoshop for architectural renderings and drawings, but playing around with photography and portrait editing is also pretty fun. This tutorial shows you how to get a magazine cover look in just ten steps.
1. Duplicate and Organize layers
First duplicate the original image by right clicking on the layer on the right. Always work on the duplicated image. Do this before every step and label the duplicated layers. Doing this will make it much easier to control the final image.
2. Removing Blemishes with Clone Stamp Tool (S)
Identify blemishes and fine lines. Use the Clone Stamp tool
to sample the skin tone and texture nearby the blemish area. Click the alt
button to sample and then cover the blemish with your stamp. Change the opacity in the upper left corner to 60% and the
size of the clone stamp sampler to accommodate the blemish size.
3. Flawless Skin with Gaussian Blur Filter and Eraser Tool
(E)
Once you have cleared the skin of any blemishes you can
smoothen it even further with a filter mask. Right click on the layer and
duplicate it. At the top select Gaussian blur under filters and set it for 3.0.
Then use the Eraser Tool (E) to bring back some detail around the eyes, mouth, nose and hair. Change the size to fit,
hardness to zero and opacity to 40% to make a soft transition from the filtered to the non filtered. If you don't want such a plastic like look you can either leave out this step or set the pixel radius lower than 3.0.
4. Lush Lashes with Clone Stamp Tool (S) and Brush Tool (B)
You can either sample part of the lashes and clone them to
another area to make them look fuller or you can draw in more lashes sampling
the color of the lash with the alt button. Size the brush to the thickness of
the lashes.
5. Remove Under Eye Shadows with Dodge Tool (O)
Set the dodge tool to an appropriate size, 10% exposure and
range midtones. Gradually remove dark
circles and shadows by lighting up the area.
6. Contour the face with Clone Stamp Tool (S) and Burn Tool
(O)
This technique is similar to contouring with makeup. Adding
shadow or highlight to certain areas can change the entire appearance of a
face. Use the clone stamp tool to move the shadows on the face. You can raise
the cheekbones slightly or narrow the nose. Change to opacity to 50% or less to get smooth shadows. Often when you take photos up close
the lens cannot correct for things that are closer to the lens making your nose
look larger than it really is.
7. Correct Eyebrows with Clone Stamp Tool (S)
Clone stamp tool is an awesome feature in Photoshop and I
use it a lot. You can sample areas of your brow and place it in areas where the
hairs are scarce. You can also change the shape of the eyebrow sampling a
larger area of the brow at 100% opacity and move the entire brow slightly.
8. Color adjustment with Hue/Saturation
Select the lip area with the polygonal lasso
tool (L) then choose hue/saturation in the adjustment layers. This way you can
add a little color to your lips. You can also choose color balance and play
with the colors of the lips at a more extreme level. But that can quickly look
strange. Then select the hair with the lasso tool and adjust the
color with same technique. I lowered the reds and the yellows in the hair to
make it appear more “blond”.
9. Make Eyes Pop with Color Balance and Burn Tool (O)
Select eye area and add color balance adjustment layer. I
just made the color a little bit more intense. But you can play around with it
until you have the desired eye color. Then use the dodge tool around the edge
of the round eye to intensify the look.
10. Stylize Image with Filters and Blending Masks
Duplicate the layer and choose soft light blending mask at 35%
opacity. Then add a black and white adjustment layer and set it at 50%. Play
with opacity or blending masks to get unique effects.
Final Image
Final Image
Subscribe to:
Posts (Atom)


